
CentOS7.3 Let’s Encrypt ワイルドカード証明書の手動更新
次のコマンドを実行
# certbot certonly --manual -d *.ドメイン名
Saving debug log to /var/log/letsencrypt/letsencrypt.log

Plugins selected: Authenticator manual, Installer None

Starting new HTTPS connection (1): acme-v02.api.letsencrypt.org

Cert is due for renewal, auto-renewing...

Renewing an existing certificate

Performing the following challenges:

dns-01 challenge for ドメイン名
– – – – – – – – – – – – – – – – – – – – – – – – – – – – – – – – – – – – – – – –
NOTE: The IP of this machine will be publicly logged as having requested this
certificate. If you’re running certbot in manual mode on a machine that is not
your server, please ensure you’re okay with that.
Are you OK with your IP being logged?
– – – – – – – – – – – – – – – – – – – – – – – – – – – – – – – – – – – – – – – –
(Y)es/(N)o: Y
IPアドレスを公にしていいか?と聞かれるので、Yを入力する。
- - - - - - - - - - - - - - - - - - - - - - - - - - - - - - - - - - - - - - - -
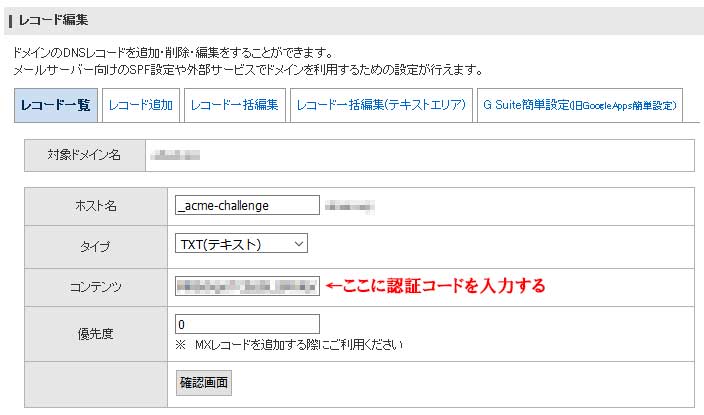
Please deploy a DNS TXT record under the name
_acme-challenge.ドメイン名 with the following value:
認証コード
Before continuing, verify the record is deployed.
– – – – – – – – – – – – – – – – – – – – – – – – – – – – – – – – – – – – – – – –
Press Enter to Continue
DNSレコードに上記の認証コードを追加する。
スタードメインの場合は、
Waiting for verification...

Cleaning up challenges
IMPORTANT NOTES:
– Congratulations! Your certificate and chain have been saved at:
/etc/letsencrypt/live/ドメイン名/fullchain.pem
Your key file has been saved at:
/etc/letsencrypt/live/ドメイン名/privkey.pem
Your cert will expire on 2020-12-21. To obtain a new or tweaked
version of this certificate in the future, simply run certbot
again. To non-interactively renew *all* of your certificates, run
“certbot renew”
– If you like Certbot, please consider supporting our work by:
Donating to ISRG / Let’s Encrypt: https://letsencrypt.org/donate
Donating to EFF: https://eff.org/donate-le
これで証明書が更新された。
Apache等のWEBサーバを再起動して、証明書が更新されたことを確認する。
CentOS7.3 ApacheにSSL証明書を導入
必要なパッケージのインストール
# yum -y install httpd openssl mod_ssl

# yum -y install git
Let’s Encrypt Client のインストール
# git clone https://github.com/letsencrypt/letsencrypt

# cd letsencrypt

# ./letsencrypt-auto --help
これで必要なパッケージが自動でインストールされる。
SSL証明書の作成
Apacheを停止する。
# systemctl stop httpd.service
対象のドメイン名を「www.example.com」の場合は以下のようにコマンドを実行する。
# ./letsencrypt-auto certonly --standalone -d www.example.com
./letsencrypt-auto has insecure permissions!

To learn how to fix them, visit https://community.letsencrypt.org/t/certbot-auto-deployment-best-practices/91979/

Saving debug log to /var/log/letsencrypt/letsencrypt.log

Plugins selected: Authenticator standalone, Installer None

Enter email address (used for urgent renewal and security notices) (Enter 'c' to

cancel):owner@example.com
上記のようにメールアドレスを求められるので、
メールアドレスを入力する。
 - - - - - - - - - - - - - - - - - - - - - - - - - - - - - - - - - - - - - - -

Please read the Terms of Service at

https://letsencrypt.org/documents/LE-SA-v1.2-November-15-2017.pdf. You must

agree in order to register with the ACME server at

https://acme-v02.api.letsencrypt.org/directory

- - - - - - - - - - - - - - - - - - - - - - - - - - - - - - - - - - - - - - - -

(A)gree/(C)ancel: A
利用規約の同意が求められるので、「A」を入力する。
- - - - - - - - - - - - - - - - - - - - - - - - - - - - - - - - - - - - - - - -

Would you be willing to share your email address with the Electronic Frontier

Foundation, a founding partner of the Let's Encrypt project and the non-profit

organization that develops Certbot? We'd like to send you email about our work

encrypting the web, EFF news, campaigns, and ways to support digital freedom.

- - - - - - - - - - - - - - - - - - - - - - - - - - - - - - - - - - - - - - - -

(Y)es/(N)o: Y
「Y」を入力する。
Obtaining a new certificate

Performing the following challenges:

http-01 challenge for www.example.com

Waiting for verification...

Cleaning up challenges
IMPORTANT NOTES:
- Congratulations! Your certificate and chain have been saved at:
/etc/letsencrypt/live/www.example.com/fullchain.pem
Your key file has been saved at:
/etc/letsencrypt/live/www.example.com/privkey.pem
Your cert will expire on 2020-06-09. To obtain a new or tweaked
version of this certificate in the future, simply run
letsencrypt-auto again. To non-interactively renew *all* of your
certificates, run "letsencrypt-auto renew"
- Your account credentials have been saved in your Certbot
configuration directory at /etc/letsencrypt. You should make a
secure backup of this folder now. This configuration directory will
also contain certificates and private keys obtained by Certbot so
making regular backups of this folder is ideal.
- If you like Certbot, please consider supporting our work by:
Donating to ISRG / Let's Encrypt: https://letsencrypt.org/donate
Donating to EFF: https://eff.org/donate-le
以上で、SSL証明書が作成された。
作成されたファイルを確認する。
# cd /etc/letsencrypt/live/www.example.com

# ls

cert.pem       ←サーバ証明書

chain.pem      ←中間証明書

fullchain.pem  ←サーバ証明書+中間証明書

privkey.pem    ←サーバ秘密鍵
ssl.confを以下のように変更する。
#/etc/httpd/conf.d/ssl.conf

SSLCertificateFile /etc/letsencrypt/live/www.example.com/cert.pem

SSLCertificateKeyFile /etc/letsencrypt/live/www.example.com/privkey.pem

SSLCertificateChainFile /etc/letsencrypt/live/www.example.com/chain.pem
httpd.confを以下のように変更する。
#/etc/httpd/conf/httpd.conf

NameVirtualHost *:80

NameVirtualHost *:443
ServerAdmin root@www.example.com
DocumentRoot /var/www/html
ServerName www.example.com
SSLEngine on
SSLCertificateFile /etc/letsencrypt/live/www.example.com/cert.pem
SSLCertificateKeyFile /etc/letsencrypt/live/www.example.com/privkey.pem
SSLCertificateChainFile /etc/letsencrypt/live/www.example.com/chain.pem
ServerAdmin root@www.example.com
DocumentRoot /var/www/html
ServerName www.example.com
Apacheを起動する。
# systemctl start httpd.service
Apacheがうまく起動しない場合は、記述が間違っていることが考えられる。
その場合は、
# service httpd configtest
でエラーが無いか、確認する。
ブラウザでサイトにアクセスした時に、自動でhttpsにリダイレクトする設定
httpd.conf(VirtualHostの場合はconf.d/*.conf)に以下を追記する。
  RewriteEngine On

  RewriteCond %{HTTPS} off

  RewriteRule ^(.*)$ https://%{HTTP_HOST}%{REQUEST_URI} [R=301,L]
NFSサーバーの設定
・/etc/exportsに共有設定を追加
書式
共有するディレクトリ 接続可能なIPアドレス(オプション)
オプション
 ro: 読み取りのみ
 rw: 読み書き可能
 no_root_squash: デフォルトでは、クライアント マシン上のユーザー root によって行われたファイル要求は、そのサーバー上のユーザー nobody によって行われたかのように扱われる。
例
/home/nfs-share 192.168.0.1(rw,no_root_squash)
サーバーの起動
NFS を起動する。
/etc/init.d/nfs start
※Portmapと関連 rpc デーモンは、NFS を起動する前に実行されている必要があります。
/etc/exports の変更
NFS サーバーが既に実行されているときに /etc/exports に変更を加えた場合は、nfsd に /etc/exports の読み取りを強制して、変更を適用する必要があります。コマンド プロンプトから、次のように入力します。
usr/sbin/exportfs -ra
NFSサーバーでマウント状況を表示する
・クライアントのホスト名とマウントされたディレクトリを表示
# showmount -a

All mount points on nfs-server:

192.168.x.x:/home/nfs-share

192.168.x.x:/home/nfs-share

192.168.x.x:/home/nfs-share
・クライアントからマウントされているディレクトリの表示
# showmount -d

Directories on nfs-server:

/home/nfs-share
・NFSサーバのエクスポートリストを表示
# showmount -e

Export list for nfs-server:

/home/nfs-share 192.168.x.x/24
Postfixのメールキュー
Postfixのメールキューを確認する。
# postqueue -p
キューをID指定で削除する。
# postsuper -d [QUEUE ID]
キューを全て削除する。
# postsuper -d ALL
キューの強制送信
# postfix flush
Redmine3.3のインストール(CentOS7.3)
Red Hat Software Collections (RHSCL)
Ruby 2.3 をパッケージでインストールするために RHSCL 2.3 相当の centos-sclo-rh リポジトリを追加
# yum install -y centos-release-scl-rh
Loaded plugins: fastestmirror
Loading mirror speeds from cached hostfile
* base: ftp.iij.ad.jp
* centosplus: ftp.iij.ad.jp
* extras: ftp.iij.ad.jp
* updates: ftp.iij.ad.jp
Resolving Dependencies
–> Running transaction check
—> Package centos-release-scl-rh.noarch 0:2-2.el7.centos will be installed
–> Finished Dependency Resolution
Dependencies Resolved
================================================================================
Package Arch Version Repository Size
================================================================================
Installing:
centos-release-scl-rh noarch 2-2.el7.centos extras 12 k
Transaction Summary
================================================================================
Install 1 Package
Total download size: 12 k
Installed size: 19 k
Downloading packages:
centos-release-scl-rh-2-2.el7.centos.noarch.rpm | 12 kB 00:00
Running transaction check
Running transaction test
Transaction test succeeded
Running transaction
Installing : centos-release-scl-rh-2-2.el7.centos.noarch 1/1
Verifying : centos-release-scl-rh-2-2.el7.centos.noarch 1/1
Installed:
centos-release-scl-rh.noarch 0:2-2.el7.centos
Complete!
Ruby2.3をインストール
# yum -y install rh-ruby23 && source scl_source enable $_
echo -e ‘#!/bin/bash\nsource scl_source enable rh-ruby23’ > /etc/profile.d/rh-ruby23.sh
Running transaction check
Running transaction test
Transaction test succeeded
Running transaction
Installing : scl-utils-20130529-17.el7_1.x86_64 1/13
Installing : rh-ruby23-runtime-2.2-7.el7.x86_64 2/13
Installing : rh-ruby23-ruby-libs-2.3.1-64.el7.x86_64 3/13
Installing : rh-ruby23-rubygem-io-console-0.4.5-64.el7.x86_64 4/13
Installing : rh-ruby23-rubygem-did_you_mean-1.0.0-64.el7.x86_64 5/13
Installing : rh-ruby23-rubygem-psych-2.0.17-64.el7.x86_64 6/13
Installing : rh-ruby23-ruby-irb-2.3.1-64.el7.noarch 7/13
Installing : rh-ruby23-ruby-2.3.1-64.el7.x86_64 8/13
Installing : rh-ruby23-rubygem-bigdecimal-1.2.8-64.el7.x86_64 9/13
Installing : rh-ruby23-rubygems-2.5.1-64.el7.noarch 10/13
Installing : rh-ruby23-rubygem-json-1.8.3-64.el7.x86_64 11/13
Installing : rh-ruby23-rubygem-rdoc-4.2.1-64.el7.noarch 12/13
Installing : rh-ruby23-2.2-7.el7.x86_64 13/13
Verifying : rh-ruby23-rubygem-json-1.8.3-64.el7.x86_64 1/13
Verifying : rh-ruby23-rubygem-io-console-0.4.5-64.el7.x86_64 2/13
Verifying : rh-ruby23-ruby-2.3.1-64.el7.x86_64 3/13
Verifying : rh-ruby23-rubygem-rdoc-4.2.1-64.el7.noarch 4/13
Verifying : rh-ruby23-rubygem-did_you_mean-1.0.0-64.el7.x86_64 5/13
Verifying : rh-ruby23-2.2-7.el7.x86_64 6/13
Verifying : rh-ruby23-ruby-irb-2.3.1-64.el7.noarch 7/13
Verifying : rh-ruby23-rubygem-psych-2.0.17-64.el7.x86_64 8/13
Verifying : rh-ruby23-ruby-libs-2.3.1-64.el7.x86_64 9/13
Verifying : rh-ruby23-rubygem-bigdecimal-1.2.8-64.el7.x86_64 10/13
Verifying : rh-ruby23-runtime-2.2-7.el7.x86_64 11/13
Verifying : rh-ruby23-rubygems-2.5.1-64.el7.noarch 12/13
Verifying : scl-utils-20130529-17.el7_1.x86_64 13/13
Installed:
rh-ruby23.x86_64 0:2.2-7.el7
Dependency Installed:
rh-ruby23-ruby.x86_64 0:2.3.1-64.el7
rh-ruby23-ruby-irb.noarch 0:2.3.1-64.el7
rh-ruby23-ruby-libs.x86_64 0:2.3.1-64.el7
rh-ruby23-rubygem-bigdecimal.x86_64 0:1.2.8-64.el7
rh-ruby23-rubygem-did_you_mean.x86_64 0:1.0.0-64.el7
rh-ruby23-rubygem-io-console.x86_64 0:0.4.5-64.el7
rh-ruby23-rubygem-json.x86_64 0:1.8.3-64.el7
rh-ruby23-rubygem-psych.x86_64 0:2.0.17-64.el7
rh-ruby23-rubygem-rdoc.noarch 0:4.2.1-64.el7
rh-ruby23-rubygems.noarch 0:2.5.1-64.el7
rh-ruby23-runtime.x86_64 0:2.2-7.el7
scl-utils.x86_64 0:20130529-17.el7_1
Complete!
Phusion Passenger のインストール
ln -s /opt/rh/rh-ruby23/root/usr/lib64/libruby.so.2.3 /usr/lib64/
yum -y install rh-passenger40 rh-passenger40-mod_passenger && source scl_source enable rh-passenger40
echo -e ‘#!/bin/bash\nsource scl_source enable rh-passenger40’ > /etc/profile.d/rh-passenger40.sh
rh-passenger40 は rh-ruby22 までしか対応していないが、rh-ruby22 だと bundle exec rake generate_secret_token を実行した際に何故か Could not find rake in any of the sources というエラーでこけるため、rh-ruby23 / rh-passenger40 の組合せ。
Git
yum -y install rh-git29 && source scl_source enable $_
echo -e ‘#!/bin/bash\nsource scl_source enable rh-git29’ > /etc/profile.d/rh-git29.sh
base リポジトリだと 1.8.3 がインストールされるため RHSCL の rh-git29 コレクションを利用する。
必要ライブラリのインストール
# yum install -y rh-ruby23-{ruby-devel,rubygem-bundler}
Loaded plugins: fastestmirror
Loading mirror speeds from cached hostfile
* base: ftp.iij.ad.jp
* centosplus: ftp.iij.ad.jp
* extras: ftp.iij.ad.jp
* updates: ftp.iij.ad.jp
Resolving Dependencies
–> Running transaction check
—> Package rh-ruby23-ruby-devel.x86_64 0:2.3.1-64.el7 will be installed
—> Package rh-ruby23-rubygem-bundler.noarch 0:1.10.6-4.el7 will be installed
–> Finished Dependency Resolution
Dependencies Resolved
==================================================================================================
Package Arch Version Repository Size
==================================================================================================
Installing:
rh-ruby23-ruby-devel x86_64 2.3.1-64.el7 centos-sclo-rh 110 k
rh-ruby23-rubygem-bundler noarch 1.10.6-4.el7 centos-sclo-rh 229 k
Transaction Summary
==================================================================================================
Install 2 Packages
Total download size: 338 k
Installed size: 964 k
Downloading packages:
(1/2): rh-ruby23-ruby-devel-2.3.1-64.el7.x86_64.rpm | 110 kB 00:00:01
(2/2): rh-ruby23-rubygem-bundler-1.10.6-4.el7.noarch.rpm | 229 kB 00:00:01
————————————————————————————————–
Total 182 kB/s | 338 kB 00:00:01
Running transaction check
Running transaction test
Transaction test succeeded
Running transaction
Installing : rh-ruby23-rubygem-bundler-1.10.6-4.el7.noarch 1/2
Installing : rh-ruby23-ruby-devel-2.3.1-64.el7.x86_64 2/2
Verifying : rh-ruby23-ruby-devel-2.3.1-64.el7.x86_64 1/2
Verifying : rh-ruby23-rubygem-bundler-1.10.6-4.el7.noarch 2/2
Installed:
rh-ruby23-ruby-devel.x86_64 0:2.3.1-64.el7 rh-ruby23-rubygem-bundler.noarch 0:1.10.6-4.el7
Complete!
# yum install -y gcc {mysql-community,libxml2,libxslt,ImageMagick}-devel ipa-pgothic-fonts
Loaded plugins: fastestmirror
Loading mirror speeds from cached hostfile
* base: ftp.iij.ad.jp
* centosplus: ftp.iij.ad.jp
* extras: ftp.iij.ad.jp
* updates: ftp.iij.ad.jp
Package gcc-4.8.5-11.el7.x86_64 already installed and latest version
No package mysql-community-devel available.
Package libxml2-devel-2.9.1-6.el7_2.3.x86_64 already installed and latest version
Package ImageMagick-devel-6.7.8.9-15.el7_2.x86_64 already installed and latest version
Resolving Dependencies
–> Running transaction check
—> Package ipa-pgothic-fonts.noarch 0:003.03-5.el7 will be installed
—> Package libxslt-devel.x86_64 0:1.1.28-5.el7 will be installed
–> Processing Dependency: libgcrypt-devel for package: libxslt-devel-1.1.28-5.el7.x86_64
–> Running transaction check
—> Package libgcrypt-devel.x86_64 0:1.5.3-13.el7_3.1 will be installed
–> Processing Dependency: libgpg-error-devel for package: libgcrypt-devel-1.5.3-13.el7_3.1.x86_64
–> Running transaction check
—> Package libgpg-error-devel.x86_64 0:1.12-3.el7 will be installed
–> Finished Dependency Resolution
Dependencies Resolved
==================================================================================================
Package Arch Version Repository Size
==================================================================================================
Installing:
ipa-pgothic-fonts noarch 003.03-5.el7 base 3.5 M
libxslt-devel x86_64 1.1.28-5.el7 base 309 k
Installing for dependencies:
libgcrypt-devel x86_64 1.5.3-13.el7_3.1 updates 129 k
libgpg-error-devel x86_64 1.12-3.el7 base 16 k
Transaction Summary
==================================================================================================
Install 2 Packages (+2 Dependent packages)
Total download size: 4.0 M
Installed size: 8.6 M
Downloading packages:
(1/4): libgcrypt-devel-1.5.3-13.el7_3.1.x86_64.rpm | 129 kB 00:00:00
(2/4): libgpg-error-devel-1.12-3.el7.x86_64.rpm | 16 kB 00:00:00
(3/4): ipa-pgothic-fonts-003.03-5.el7.noarch.rpm | 3.5 MB 00:00:00
(4/4): libxslt-devel-1.1.28-5.el7.x86_64.rpm | 309 kB 00:00:00
————————————————————————————————–
Total 6.1 MB/s | 4.0 MB 00:00:00
Running transaction check
Running transaction test
Transaction test succeeded
Running transaction
Installing : libgpg-error-devel-1.12-3.el7.x86_64 1/4
Installing : libgcrypt-devel-1.5.3-13.el7_3.1.x86_64 2/4
Installing : libxslt-devel-1.1.28-5.el7.x86_64 3/4
Installing : ipa-pgothic-fonts-003.03-5.el7.noarch 4/4
Verifying : ipa-pgothic-fonts-003.03-5.el7.noarch 1/4
Verifying : libgpg-error-devel-1.12-3.el7.x86_64 2/4
Verifying : libxslt-devel-1.1.28-5.el7.x86_64 3/4
Verifying : libgcrypt-devel-1.5.3-13.el7_3.1.x86_64 4/4
Installed:
ipa-pgothic-fonts.noarch 0:003.03-5.el7 libxslt-devel.x86_64 0:1.1.28-5.el7
Dependency Installed:
libgcrypt-devel.x86_64 0:1.5.3-13.el7_3.1 libgpg-error-devel.x86_64 0:1.12-3.el7
Complete!
Redmine のインストール
cd /var/www && git clone https://github.com/redmine/redmine.git && cd redmine
git checkout `git tag | tail -n 1`
bundle config build.nokogiri –local –use-system-libraries
cat << "_EOF_" > config/database.yml
production:
adapter: mysql2
database: redmine
host: localhost
username: root
password: P@ssw0rd
encoding: utf8
_EOF_
bundle install –without development test
bundle exec rake generate_secret_token
bundle exec rake db:migrate RAILS_ENV=production
bundle exec rake redmine:load_default_data RAILS_ENV=production REDMINE_LANG=ja
chown -R apache. /var/www/redmine
chmod -R 755 files log tmp public/plugin_assets
setenforce 0 #TODO: SELinux Settings
そのままだと nokogiri のインストール時に An error occurred while installing nokogiri, and Bundler cannot continue. とエラーが出るので、–use-system-libraries オプションを事前に指定してやる。
rh-ror42-rubygem-bundler 以外にも rubygem パッケージがあるが、バージョンが足りないものやパッケージ化されていないものもあり、また検証した結果不具合が生じるのでパッケージ利用を断念。
bundle exec rails server webrick -e production -b 192.168.56.101 を実行すると簡易的に http://192.168.56.101:3000/ でアクセスできるようになるので、切り分けが必要なときなどに利用する。
アフィリエイトに最適!
格安IP分散サーバーなら
【CIPレンタルサーバー】

クリエイターがたくさん使ってる、ロリポップ!
独自ドメインやデータベース、PHP・CGI・SSIはもちろん 大人気Wordpressなどの簡単インストールをはじめ、
カート機能、cron、SSH、共有/独自SSLなど機能満載。
メールアドレスはいくつでも作成可能!
容量最大1000GBで月額100円(税抜)から。